CentOS7 APM 서버 구축 (Apache, PHP 7.3 , MySQL)
APM을 연동하고 구축하는 서버를 만들어서 테스트를 진행해볼 예정
- Apache : 웹서버
- PHP : 웹 내에서 동적 컨텐츠 생성 스크립트 언어
- MariaDB : 데이터베이스 관리 시스템 ( DBMS )
[ APM 서버 구축 ]
- rpm --import /etc/pki/rpm-gpg/RPM-GPG-KEY*
- yum -y install epel-release
최신 phpMyAdmin 버전을 설치하기 위해 EPEL repo를 추가한다. ( default repo에는 APM 구축에 필요한 phpMyAdmin이 없어서 설치하는 것임 )
- yum list | grep -i phpmyadmin
epel 레파지토리에 있는것을 확인하였음
[root@localhost ~]# rpm --import /etc/pki/rpm-gpg/RPM-GPG-KEY*

[root@localhost ~]# yum -y install epel-release
Loaded plugins: fastestmirror
Loading mirror speeds from cached hostfile
 * base: mirror.kakao.com
 * extras: mirror.kakao.com
 * updates: mirror.kakao.com
Resolving Dependencies
--> Running transaction check
---> Package epel-release.noarch 0:7-11 will be installed
--> Finished Dependency Resolution

[root@localhost ~]# yum list | grep -i phpmyadmin
php-phpmyadmin-motranslator.noarch        3.4-1.el7                    epel
php-phpmyadmin-shapefile.noarch           2.0-1.el7                    epel
php-phpmyadmin-sql-parser.noarch          4.2.5-1.el7                  epel
phpMyAdmin.noarch                         4.4.15.10-4.el7              epel
[ MySQL (MariaDB) 설치 ]
mARIAdb는 MySQL의 개발자가 만든 것으로 MySQL과 견줄만 하며 대신 설치해도 무방하다.
- yum -y install mariadb-server mariadb
- systemctl restart mariadb.service // .service 생략 가능
- systemctl enable mariadb.service
- systemctl status mariadb.service
데몬을 재시작하고 부팅 후에 언제나 자동으로 시작하도록 설정 한 이후 확인까지 해봄
[root@localhost ~]# yum -y install mariadb-server mariadb

[root@localhost ~]# systemctl restart mariadb.service
[root@localhost ~]# systemctl enable mariadb.service
Created symlink from /etc/systemd/system/multi-user.target.wants/mariadb.service to /usr/lib/systemd/system/mariadb.service.

[root@localhost ~]# systemctl status mariadb.service
● mariadb.service - MariaDB database server
   Loaded: loaded (/usr/lib/systemd/system/mariadb.service; enabled; vendor preset: disabled)
   Active: active (running) since Thu 2020-04-02 04:26:27 PDT; 11s ago
 Main PID: 18703 (mysqld_safe)
   CGroup: /system.slice/mariadb.service
           ├─18703 /bin/sh /usr/bin/mysqld_safe --basedir=/usr
           └─18865 /usr/libexec/mysqld --basedir=/usr --datadir=/var/lib/mysql --plugin-...

Apr 02 04:26:25 localhost.localdomain mariadb-prepare-db-dir[18611]: MySQL manual for mo...
Apr 02 04:26:25 localhost.localdomain mariadb-prepare-db-dir[18611]: Please report any p...
Apr 02 04:26:25 localhost.localdomain mariadb-prepare-db-dir[18611]: The latest informat...
Apr 02 04:26:25 localhost.localdomain mariadb-prepare-db-dir[18611]: You can find additi...
Apr 02 04:26:25 localhost.localdomain mariadb-prepare-db-dir[18611]: http://dev.mysql.com
Apr 02 04:26:25 localhost.localdomain mariadb-prepare-db-dir[18611]: Consider joining Ma...
Apr 02 04:26:25 localhost.localdomain mariadb-prepare-db-dir[18611]: https://mariadb.org...
Apr 02 04:26:25 localhost.localdomain mysqld_safe[18703]: 200402 04:26:25 mysqld_safe L....
Apr 02 04:26:25 localhost.localdomain mysqld_safe[18703]: 200402 04:26:25 mysqld_safe S...l
Apr 02 04:26:27 localhost.localdomain systemd[1]: Started MariaDB database server.
Hint: Some lines were ellipsized, use -l to show in full.
# mysql_secure_installation MySQL의 root 정보 설정
[root@localhost ~]# mysql_secure_installation
NOTE: RUNNING ALL PARTS OF THIS SCRIPT IS RECOMMENDED FOR ALL MariaDB
SERVERS IN PRODUCTION USE! PLEASE READ EACH STEP CAREFULLY!
In order to log into MariaDB to secure it, we'll need the current
password for the root user. If you've just installed MariaDB, and
you haven't set the root password yet, the password will be blank,
so you should just press enter here.
Enter current password for root (enter for none): // Enter (Default 값, 표시들은 Enter 눌러주자)
OK, successfully used password, moving on...
Setting the root password ensures that nobody can log into the MariaDB
root user without the proper authorisation.
Set root password? [Y/n] // Enter
New password: // Password 설정
Re-enter new password: // 재 확인
Password updated successfully!
Reloading privilege tables..
... Success!
By default, a MariaDB installation has an anonymous user, allowing anyone
to log into MariaDB without having to have a user account created for
them. This is intended only for testing, and to make the installation
go a bit smoother. You should remove them before moving into a
production environment.
Remove anonymous users? [Y/n]
... Success!
Normally, root should only be allowed to connect from 'localhost'. This
ensures that someone cannot guess at the root password from the network.
Disallow root login remotely? [Y/n]
... Success!
By default, MariaDB comes with a database named 'test' that anyone can
access. This is also intended only for testing, and should be removed
before moving into a production environment.
Remove test database and access to it? [Y/n]
- Dropping test database...
... Success!
- Removing privileges on test database...
... Success!
Reloading the privilege tables will ensure that all changes made so far
will take effect immediately.
Reload privilege tables now? [Y/n]
... Success!
Cleaning up...
All done! If you've completed all of the above steps, your MariaDB
installation should now be secure.
Thanks for using MariaDB!
[ Apache 2 설치, 포트 열어주기 ]
- yum -y install httpd
- systemctl restart httpd
- systemctl enable httpd
- systemctl status httpd
[root@localhost ~]# yum -y install httpd

[root@localhost ~]# systemctl restart httpd

[root@localhost ~]# systemctl enable httpd
Created symlink from /etc/systemd/system/multi-user.target.wants/httpd.service to /usr/lib/systemd/system/httpd.service.

[root@localhost ~]# systemctl status httpd
● httpd.service - The Apache HTTP Server
   Loaded: loaded (/usr/lib/systemd/system/httpd.service; enabled; vendor preset: disabled)
   Active: active (running) since Thu 2020-04-02 04:30:01 PDT; 42s ago
     Docs: man:httpd(8)
           man:apachectl(8)
 Main PID: 20317 (httpd)
   Status: "Total requests: 0; Current requests/sec: 0; Current traffic:   0 B/sec"
   CGroup: /system.slice/httpd.service
           ├─20317 /usr/sbin/httpd -DFOREGROUND
           ├─20318 /usr/sbin/httpd -DFOREGROUND
           ├─20319 /usr/sbin/httpd -DFOREGROUND
           ├─20320 /usr/sbin/httpd -DFOREGROUND
           ├─20321 /usr/sbin/httpd -DFOREGROUND
           └─20322 /usr/sbin/httpd -DFOREGROUND

Apr 02 04:30:01 localhost.localdomain systemd[1]: Stopped The Apache HTTP Server.
Apr 02 04:30:01 localhost.localdomain systemd[1]: Starting The Apache HTTP Server...
Apr 02 04:30:01 localhost.localdomain httpd[20317]: AH00558: httpd: Could not reliably ...e
Apr 02 04:30:01 localhost.localdomain systemd[1]: Started The Apache HTTP Server.
Hint: Some lines were ellipsized, use -l to show in full.
- firewall-cmd --permanent --zone=public --add-service=http
- firewall-cmd --permanent --zone=public --add-service=https
- firewall-cmd --reload
- firewall-cmd --list-all // 확인해보면 https 와 http의 service가 추가된 것을 확인할 수 있다.
[root@localhost ~]# firewall-cmd --permanent --zone=public --add-service=http
success
[root@localhost ~]# firewall-cmd --permanent --zone=public --add-service=https
success
[root@localhost ~]# firewall-cmd --reload
success

[root@localhost ~]# firewall-cmd --list-all
public (active)
  target: default
  icmp-block-inversion: no
  interfaces: ens33
  sources:
  services: dhcpv6-client http https ssh
  ports: 22/tcp 53/tcp
  protocols:
  masquerade: no
  forward-ports:
  source-ports:
  icmp-blocks:
  rich rules:
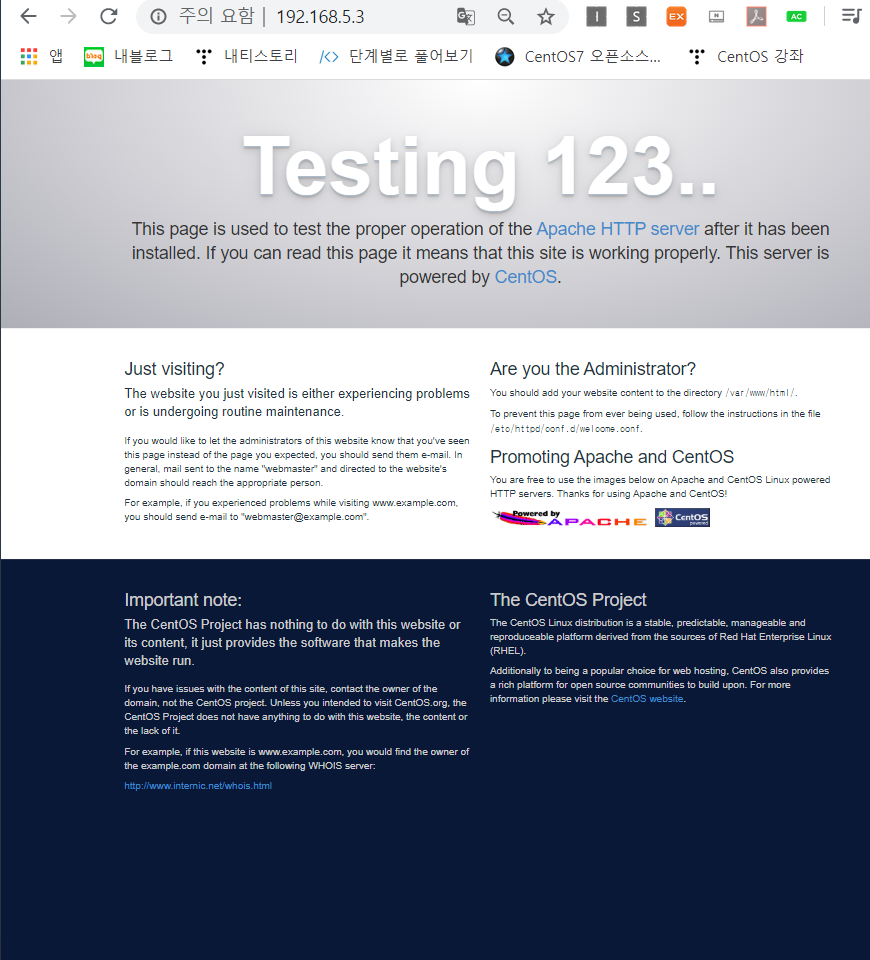
[ Apache 2 서버 접속해보기 ]
192.168.5.3은 저에게 할당된 IP주소이니 각자 실습하고 있는 서버의 ip를 쳐서 접속해본다면 이와 같이 뜰 것입니다.
[ PHP 7.3 설치하기 ]
- rpm -Uvh http://rpms.remirepo.net/enterprise/remi-release-7.rpm
- yum -y install yum-utils
- yum update // 다 yes 해줌
Remi CentOS Repo를 설치한 이후, yum-utils 패키지를 설치해줌 ( yum-config-manager 사용하기 위헤 )
[root@localhost ~]# rpm -Uvh http://rpms.remirepo.net/enterprise/remi-release-7.rpm
Retrieving http://rpms.remirepo.net/enterprise/remi-release-7.rpm
warning: /var/tmp/rpm-tmp.wDSeWM: Header V4 DSA/SHA1 Signature, key ID 00f97f56: NOKEY
Preparing...                          ################################# [100%]
Updating / installing...
   1:remi-release-7.7-2.el7.remi      ################################# [100%]

[root@localhost ~]# yum -y install yum-utils
Loaded plugins: fastestmirror
Loading mirror speeds from cached hostfile
 * base: mirror.kakao.com
 * epel: fedora.cs.nctu.edu.tw
 * extras: mirror.kakao.com
 * remi-safe: ftp.riken.jp
 * updates: mirror.kakao.com
remi-safe                                                           | 3.0 kB  00:00:00
remi-safe/primary_db                                                | 1.7 MB  00:00:01
Resolving Dependencies

..
..
..

[root@localhost ~]# yum update

..
..
..
이제, 어떤 PHP 버전을 서버에서 사용할 것인지 고를 일만 남았다. 우리는 PHP 7.3 버전을 설치해볼 것이다.
- yum-config-manager --enable remi-php73
- yum -y install php php-opcache
- systemctl restart httpd
[root@localhost ~]# yum-config-manager --enable remi-php73

[root@localhost ~]# yum -y install php php-opcache

[root@localhost ~]# systemctl restart httpd
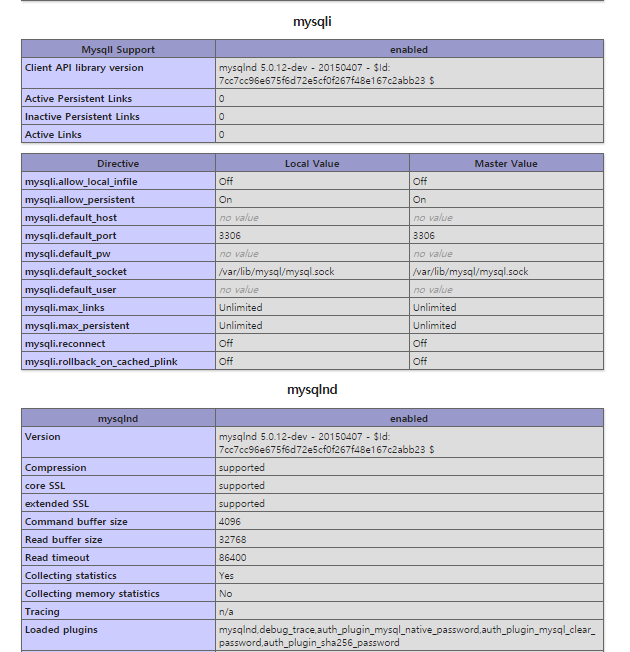
[ PHP Test 하기 ]
작은 PHP 파일 (info.php)을 만들어볼 것이다. 간단하게 써줄 것.
- vi /var/www/html/info.php
vi /var/www/html/info.php
- 192.168.5.3/info.php
서버 ip주소/info.php (생성한 파일 이름)

[ PHP에 MySQL 지원하기 ]
- PHP Module 설치
- http 대몬 재실행
yum -y install php-mysqlnd php-pdo

yum -y install php-gd php-ldap php-odbc php-pear php-xml php-xmlrpc php-mbstring php-soap curl curl-devel

[root@localhost ~]# systemctl restart httpd
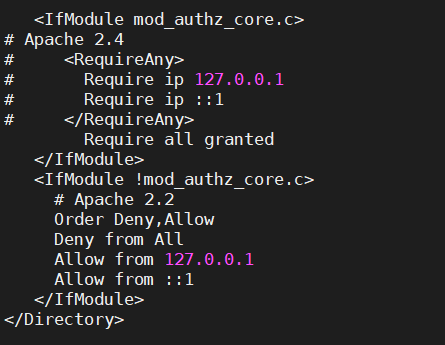
[ phpMyAdmin 설치 ]
- vi /etc/httpd/conf.d/phpMyAdmin.conf
- systemctl restart httpd
[root@localhost ~]# yum -y install phpMyAdmin

[root@localhost ~]# vi /etc/httpd/conf.d/phpMyAdmin.conf

[root@localhost ~]# systemctl restart httpd
# 빨간 부분 추가 및 주석 처리
<IfModule mod_authz_core.c>
# Apache 2.4
# <RequireAny>
# Require ip 127.0.0.1
# Require ip ::1
# </RequireAny>
Require all granted
</IfModule>
<IfModule !mod_authz_core.c>
..
..
[ 접속 확인 ]
192.168.5.3/phpmyadmin/ 으로 접속


'OS,Network,Container' 카테고리의 다른 글
| CentOS7 DNS 서버 구축 #2 - Master 서버 구축 (2) | 2020.04.21 |
|---|---|
| CentOS7 DNS 서버 구축 #1 - Name Server 개념, 원리 (0) | 2020.04.21 |
| CentOS7 swap 파티션 추가, LABEL 작업 (4) | 2020.04.18 |
| 리눅스 NTP 서버 개념 (NTP server) (2) | 2020.04.18 |
| 리눅스 부팅 과정 Process ( CentOS7 ) (5) | 2020.04.17 |


